Saturday, August 15, 2015

The power of Photoshop

I like Photoshop. For a newbie photographer like me, Photoshop is a blessing. With Photoshop I can correct mistakes I've done when shooting the picture. And yes, I do correct a lot of mistakes too, I don't just improve and finish the photo. But sometimes I run into trouble. Maybe one day I get so good that I can just do what I want without the despair, scratching my head, full time panic and all that. (I hear you go: Yeah, right, wishful thinking. Not to worry, I thought the same...Haa... )

The other day I started on a photo that I was quite sure that I couldn't get to look the way the model would expect. (Like all the other ones, what's the trouble?) At the time for the shooting, she had a picture that she showed me and asked if we could do something similar. I said ok, let's try, but when looking at the raw photos I realized that I wouldn't be able to do it. Obviously I have been too god at faking my photographer skills... (Please don't laugh, you know, eat your words and all that.) I'm not that good at photoshopping nor at photography,  not yet. Maybe one day when I have had a lot of practice, but not yet. I sincerely hope that day will come before I die, but I kind of doubt it.

You can do almost anything in Photoshop, people do it all the time. The problem is doing it and making it look good. I still have serious troubles with some of the features in Photoshop, I just can't get it right and looking good. There is always a trace left, a trace that tells, and the whole thing about photoshopping is to do it in such a way that it isn't noticed. I think most of you have seen those awkward photoshop mistakes-collections published all over Internet, right? Those are the ones I'd like to avoid. If possible.

So, what to do when you are stuck? Like all other times, you find a workaround. I did too, but as soon as I got started, I realized once again that I was in over my head. (I've had that a lot lately. Blonde....) But this time I got such a stupid idea that I realized that I could actually get away with it. Doesn't happen too often so I got right at it.

I had already processed the photo I took of the model. (A friend of mine helped me a lot, he also tried to show me how I should do it, but this blonde was not smart enough to get it done the way it should be.) So, I took a second photo of something as plain as a piece of paper. Folded. And then I got started on combining the two. That was a lot of fun. The second time I did it, the first time it was plain pain...

But I do think the result is ok. Not excellent, not fabulous, not even good, but ok. And for someone who has been photographing and using photoshop very irregularly for about nine months, that is pretty much acceptable. This is a hobby for me, I have no inspirations to go professional. (Good for me, otherwise I would be starving....)

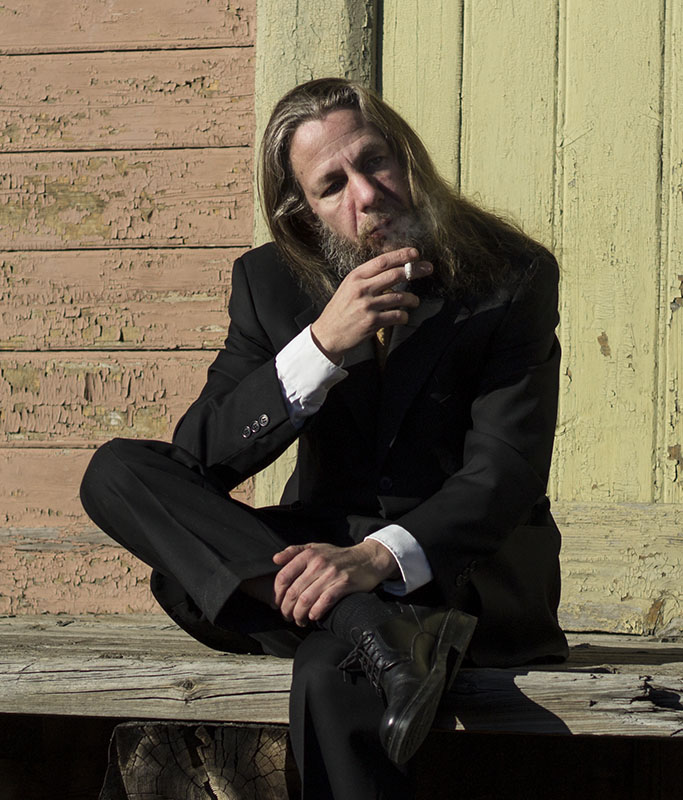
This is the finished picture:

Model: Vera Missyris

I don't know what you think but I know that it is great fun to fool around with the warp tool. It's better than ..... (No, not that! Who do you think I am? Really?)

Saturday, July 25, 2015

Home studio assembled without serious loss of limbs and lives

Finally! After long consideration, hours of surfing for the best deal and a lot of decision anxiety, I had my studio equipment delivered. I thought about it for a long time, then decided on Elinchrom lights. I have used them before and they also have the advantage that old and new models can be used side by side, there is no need to renew the whole studio if you want to upgrade. It is possible to do it step-by-step. I got a good price on a three-headed studio set, Elinchrom D-Lite RX One, with umbrellas and a softbox. Since I'm not that familiar with umbrellas, I ordered another softbox. Must be careful not to get stuck with too much new things to learn, I am blonde. (Yes, I did try to color my hair black once, but I just had to resign, Mother Nature cannot be fooled.)

The studio set is 'to go', which means that I have carrying bags for everything. However, after spending the afternoon assembling the stuff, I quickly decided that this equipment is not going anywhere..... Too much trouble, not to mention hazardous to knees, ankles, eyes, fingers and nails. Mostly to nails.

I of course had to test that everything worked. That all the flashes flashed at the right time. They did, by the way. Most kind of them. But it took a while to figure out the settings, mostly because I was so eager to get started so I did not read the instructions. Bad choice. Always read the instructions! You are bound to have to read them later anyway, when all your trial and errors result in nothing. So, take it from someone who been there and tried that, Read The #¤&(&/%#" Manual! It will save a lot of good anger and despair to be used at a later convenience.

I had earlier bought a new computer since I needed a little bit more resources for Photoshop. Not as good a computer as I wanted to, my wallet and I had us a pretty nasty argument on that one a while back. Needless to say, my wallet won. Darn. But of course, as always, there is something you haven't taken into account. And there was: the colors did not match. I put both computers next to each other, opened the same picture on both computers and discovered that there were differences in color. So, here goes, the 64.000$ question: which one was right if any of them was?

The same delivery that got me the studio equipment also brought me a small monitor calibration tool called X-Rite ColorMunki Smile. I have yet to discover the Smile-part, since there was not much of that around when I installed it and calibrated the monitor. I re-calibrated the monitor many times until I finally had to settle for the results as being the correct ones. I was horrified. It seems like my old computer was seriously out wandering in the dark. That gave me a good scare. However, I looked through my earlier pictures, and luckily they were quite alright. Some of them better than others, depending on the settings and post processing on the photos.

I just wanted to see if everything worked, so I took a few test shots. My old faithful companion Teddy Rocker did the modeling for once. I think it the result is quite alright for a home studio for a hobby photographer, I have lots of possibilities to try new things and learn new and that is what I was looking for in the first place. Win - win.

Teddy Rocker

Saturday, July 4, 2015

New hometown with lots to photograph

Finally I'm here. In Tallinn, Estonia with its old town and modern town next to each other. Tallinn to me is a city of contrasts, there is old, fashionably such and less fashionably, and new side by side. I'm really not sure which part I like the best, but I know it opens a lot of opportunities when it comes to backgrounds. And theme-inspired photos. And.... And.... And so on.

Of course I had planned everything when I got here, first I take care of the necessary stuff like unpacking, then I start playing with my camera and Photoshop. Any guesses how long I stuck to that decision? Well, I got here on Sunday evening, late. And with a new job, I started Monday, and all of the visits to different authorities after work and my brothers bringing my things from Finland I think I have been most patient. I made it until today, Saturday.

I woke up today and realized that today is the day I'm going to test the Brenizer Method and actually publish the result. I have tried the method before a couple of times and I have to say that I like it. My current computer doesn't. So I have to convert all the pictures to .jpegs before I try to merge them in Photoshop. That of course makes it harder to edit, but since I'm only doing minor changes I don't mind.

The trouble with using the Brenizer Method in Old town, Tallinn, Estonia is that there is a #¤%#¤# lot of tourists. (Yeah, look who's talking.....) They tend to get in your picture anywhere you go. And most of them wants to take their own pictures with their cellular phones or overly expensive cameras (yeah, again, look who's talking...), which means that at any given time there is a number of tourists between you and your subject. I don't mind the people who take their pictures and move on. I do mind all those taking their pictures, checking their maps, discussing the next course of action and only then move on. Luckily there are not that many of them, but the few are the more annoying.

I had to be fast when I took the pictures for the Brenizer panorama below. I took altogether 22 pictures for it. I have my camera on RAW, because you never know when you might need it. And as some of you might recall, I grew up using film with 12 or 24 pictures, having a 8Gb card with room for almost 300pics even if your shooting RAW is like paradise to me. So, I shoot RAW.

My computer have been giving me the silent treatment ever since I tried to make a face out of song lyrics. I saw a tutorial on Youtube and of course I had to try. The tutorial features the face of John Lennon, I think some of you will recognize the picture in it. Here is the link.

I think I did good:
Model: Minna Lähdemäki

The trouble with this picture is the file size, I ended up with a Photoshop file around the size of 350Mb. My computer did not like that. It doesn't like panoramas either. But after the first try some months ago, I decided that for now I only shoot panoramas that I don't need to edit that much, that way I can convert the needed files to .jpegs before I start. So I did this time too, all files where converted to 1000x1500 pixel .jpegs. with 300dpi. And then I merged them in Photoshop. Or, I watched as my computer did the work. I just looked busy. And ate some chocolate.

I think the result is just fine, I only made some small adjustments in contrast and such.


Very nice spots to plant trees, I have to say. Maybe you understand why I like this town?

Saturday, March 21, 2015

The Living Daylight

So, why use artificial light when you can use natural light? Because.

Artificial light and studio shooting gives you the advantage of getting to set up lighting as you want it. You can set angles, focus points and pretty much set things just the way you want it. But sunlight, how do you control that? I have no remote. And trusting the Higher Power to change luminosity according to your desire? Nah.

I have had a few ideas involving an abandoned railway station for a while now. I finally got around to doing something about it, this because the perfect model came along. A good friend and skilled photographer, Pii (you need a Facebook account to follow the link), agreed to appear in front of my camera.

It is always good to have a few locations planned when shooting outdoors. There is one thing besides natural light that you can't control, that is the movement of ordinary people. And their cars. Some people see you trying to get a photo and moves out of the way, others do it after you politely ask, but sometimes it is just as easy to move to the next location. You can edit out people if you want to, but those trees are quite rude, no matter how you want them to move since you need to stand just there to get the lighting right in the photo..... Or you can just go for a coffee and come back later when the sun has moved.

The main difference between shooting in natural light and in a studio according to me: a studio environment is easier to control, BUT you also need to know more technical stuff about lights and shadows. You can easily move lights around to adjust angles and luminosity, so it is easier to get a feeling to the photo. Shooting in natural light requires more of an idea and more flexibility in the model, since it is the model you need to 'adjust', otherwise your photo comes out looking like a thirteen-in-a-dozen vacation picture. You can play with time since natural light differs during the day, you can play with weather conditions (well, yeah...), but the light you have is what you get. You can give extra lights and reflectors a try, if you want to, of course. I don't, simply because I don't know how to use them. Yet.

Your camera settings gives you some kind of freedom when shooting in natural light. I use a nifty fifty lens (EF50mm f/1,8 II), which has a peak at f2,8, so that was what I used. The rest of the settings where set to match that. Have to be careful not to overexpose the photo, though.

According to good photography traditions (? at least for me) we started with coffee. And some snacks. Sometimes I wonder if getting into photography is just an excuse for me for having coffee with friends and meeting new interesting people. Maybe so, but I kind of like it, I'll keep doing that. As long as I don't need to require a new wardrobe from time to time after significant weight gain...

All and all, that afternoon gave a lot and I learned a lot. I still have some unprocessed photos, I hope I'll get around to them soon. But here are the two photos I already finished:

"Smoking"

Very little post-processing on both photos. I didn't think either photo needed much.

"Late Arrival"

So, now it's just the rest left. Phew....

Tuesday, February 3, 2015

The Project

Here we go. This is going to be great fun!

What happens when a professional photographer, a videographer and a hobby photographer get together? We first go to the flee market and then we get pizza, of course.

But after having taken care of the more insistent matters, we get to planning. One more-or-less stupid idea after the other and we actually have something that will work. And eagerly we challenge all the problems that arise. (NO, not digestive problems, those other ones.)

First, a small introduction. As many of you have guessed, the professional photographer I referred to is no other than my good friend and tutor Heidi Järvi. A new acquaintance for you at this time is talented videographer Sonja Viljanen. The hobby photographer is of course yours truly.

Now it's time for the Warning. Nothing in this project is sane. I mean nothing. Well, the art is beautiful and the laughter is real, but not much else. But, ooooh, the fun memories.....

As everything else, it has not happened unless it is on Facebook. Therefore: https://www.facebook.com/pages/Broken-Screen-Pictures/1535517400050536
(You should be able to view the page even without a Facebook account.) This is the official page for our project, Broken Screen Pictures. Check it out if you have a chance. You will probably be disappointed but, oh well, I'd hate to say 'I told you so'....

We had some ideas when we started, but as all (at least most) other projects this one escalated too. From starting with planning one small poster and video, we found ourselves planning sequels. We also quickly introduced a Villain. Good thing a quick look in the address book revealed a bunch of equally minded friends. There is a lot of pizza-lovers out there...

Now for the advertisement.


Stay tuned...

Tuesday, January 13, 2015

The Model

HAPPY NEW YEAR 2015!

Ok, so with the social obligations over, time to concentrate on the matter at hand: photography and today more specifically: the Model.

I have had the opportunity to do a lot of photography shoots during the holidays. I have shot (I'll never get over the feeling of 'murderer' that phrase gives me) five different models, out of them one was a dog. A really nice dog, have to say.

Sunique Valkyria "Saaga"

I hope you notice how nicely still she is? That is because owner Heidi (who else) has dog candy in her hand. Her hand being in the direction Saaga is looking. What can I say, she's a lady... You guess which one I'm talking about.

A few days ago I photographed the only other not human model. I took 52 photos of an omelet. Yes yes, I know what you think, but this was a BACON omelet!Y'all hear? It took 52 tries to get the photo to look right, you know to get the beautiful brownish-yellow crispy surface to look right? 52 pics is not much in that case I think. I'm not a professional photographer, this was the first time I tried shooting food. (This time the phrase sounded much better?!?)

It is like that with all models, you need to figure out the right light and have the right settings in the camera in order to get the model to look 'right'. You can fix a lot in Photoshop, but not all things, good planning really makes the picture. If your shadows are in the right place, your photo get dept, it gets a feeling. You can enhance shadows and light spots in Photoshop, but it is hard to move them. It can be done, of course, but sometimes it is just easier to do the photoshoot over again with the right light. I mean, you would want your model to look beautiful, wouldn't you? I do. I believe that, as photographer, it is my job to get the model to look good. There are different poses you can use for you model, different lights and also different colors. I want to make people, dogs and other things look good in my pictures, otherwise I don't think I have done a good job. (Except for the theme photos, they have a little rougher story, thus they have another purpose.)

No matter who/what the model is, you're going to need more than one photograph of it. Yes, it might be hard to choose which one to start photoshopping, but you might want to have some alternatives. Worst case scenario you can 'build' you photo from bits and pieces of multiple photos from the same photoshoot. Sometimes you might want to do that on purpose. But it comes down to choosing the photo, the one you think have potential. Often you know when you take the photo that this is the one, other times you have an idea but end up changing it because something else comes to mind. No, I don't use the word 'better' since there is no way to know. You'll have to finish both photos to be able to tell.

I like working with Photoshop. I like looking at lights and shadows. I like fooling around with colors and lately I have also tried some composites.
Digital compositing is the process of digitally assembling multiple images to make a final image, typically for print, motion pictures or screen display. It is the evolution into the digital realm of optical film compositing.
That's great fun. But I think that the biggest problem is choosing the 'right' photo to work with. That always gives me some trouble. Well, if there is more than one alternative, there is going to be some amount of decision anxiety. Especially when you're familiar with the 50-50-90-rule: if there is a 50% chance to get something right, there is a 90% risk to get it wrong. Been there, tried that...

What I always do, and I think I always will, (Heidi, be warned) is that I send the in-my-mind-ready-picture to Heidi for a final check before I publish it. I think many use similar processes, because after a photoshop-while your eyes get tired and you might not see everything correctly anymore, your eye get used to the picture. Therefore it is always good to get a fresh pair of eyes to look at it. In this case we discovered an interesting feature, the picture actually changed when viewed on the mobile. Well, lucky this time, since the color hue was actually better as the mobile showed it. It took some time though to figure out how to change it to match the distortion. But I think I got it just right.

"Waiting In Shadows"

QUIZ: How many of you expected a photo of the omelet?

Friday, December 12, 2014

In the studio again

I still really like the studio. It also freaks me out. All the lights and the lights and don't forget the lights. And a background or five.

The Studio is still a strange place but I'm getting more comfortable around it. It very much helps to just sit down and follow Heidi. She knows what to to, explains it all to me and also gives practical examples. Such as ergonomically favorable photographing positions:

NOTE! Picture NOT photoshopped!

Heidi went into the studio last week and I took the opportunity to go with her, as an assistant and BTS-photographer (Behind The Scenes, good way to get started on documentary photography) but also shooting myself. Milla acted as model and Minna did the make-up and hair for Heidi's shot. So, of course I used the occasion to my favor. As my grandmother used to say: "Man får vara glömsk men inte dum" (~ you are allowed to be forgetful, but not stupid), a very fine motto in my opinion. So, taking advantage of the make-up and the lighting that Heidi had used for her shot, I did this:

"Goldilocks"

I think I got that one about right.

I'm still nervous in the studio and instructing an unfamiliar model is challenging for me. Being 40+ I do have some sort of reputation to uphold, I can't just ask any stupid question in front of young girls like that, can I? So, I'm continuously developing my faking skills. (Just wondering how to get that somewhat discretely into my CV...) It's pretty easy, I just listen to Heidi and talk like her. "Lean forward", "Lift your cheek" and "Turn your head to your right" and stuff like that. And every now and then I ask for more light or less light or a light to be moved. It works! People actually think I know what I'm doing. Good one.

I also found a new toy (after three weeks of trying and failing and finally swallowing my pride and asking Heidi to show me again...), the High Pass filter. (Btw got this one right, never thought of this as a Japanese art form. I'm getting there.) I like the effects you can get with this filter. I also discovered that colored film can be used just as well in front of the camera instead of in front of the lights for effects. Had to try:

"Innocence"

This time with Iida as model.

I like photographing and photoshopping. It does me good, my mind is in balance. Photographing makes me pretty normal, like too many other people I nowadays have no time for exercise, have irregular eating habits and gain weight from chocolate. Pretty good after having spent about 40 years being so abnormal that there are diagnoses (plural) for that. Excellent therapy!